


R&D AND TECHNICAL SUPPORT ENGINEER
Nuvoton requires the “Nu-Link” programmer and the “NuMicro ICP Programming Tool” software to program the micro-controllers. If any ”Nuvoton Development Board is being used, there is no need for Nu-Link or Nu-Link-Pro, since there is already a built-in programmer (Nu-Link-Me) on the board.
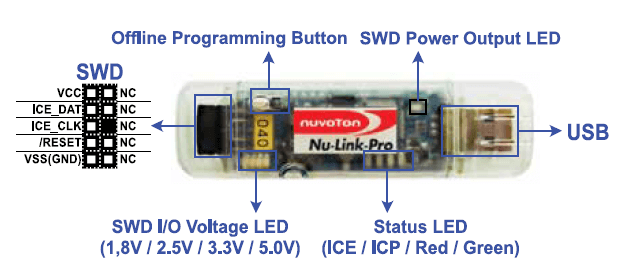
Types of Nu-Link Programmers
Nuvoton offers different Nu-Link models for different needs. Although the main purpose of these models is to install software on the micro-controller, there are some differences between them as well. Debug and Online Programming functions are available on all models, while Offline Programming is available only on Nu-Link-Pro and Nu-Link. With Offline Programming function, the *.hex file of the software to be loaded into the micro-controller is loaded into the programmer memory. Without the need for any computer, the program installation process can be performed by simply feeding the programmer via USB. The last different feature is the supported voltage values. Nu-Link-Pro supports 1.8V, 2.5V, 3.3V and 5.0V, Nu-Link only supports 5.0V and Nu-Link-Me supports 3.3V and 5.0V (Nu-Link-Me is the programmer built into the “Nuvoton Development Board”).
Installation of NuMicro ICP Programming Tool
To download the NuMicro ICP Programming Tool software, click on the link below and select ICP_Programming_Tool_V3.00.6909. zip file. The V3.00.6909 at the end of the file indicates the software version. You may see different versions at different times during download. Link: https://www.nuvoton.com/tooland- software/software-developmenttool/ programmer/ Once the download is completed, the compressed file in .zip format is extracted to the folder. Afterwards, the .exe file is used to complete the standard installation.
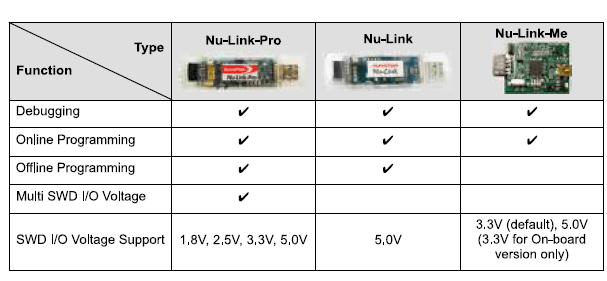
“Although the main purpose of Nu-Link models is to install software on the micro-controller, there are some differences between them as well.”

Using the NuMicro ICP Programming Tool
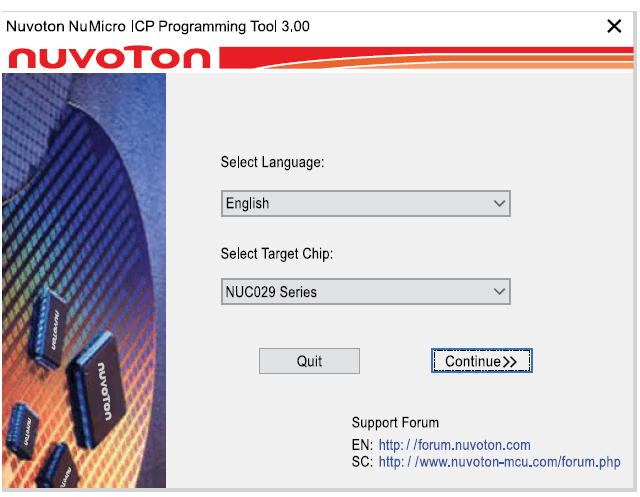
After the installation is complete, launch the program; you will see an interface where you can select the language and processor series. After the micro-controller series selection is made, all settings and choices related to the program are made on the interface.
In this interface, there are 5 tabs at the top. These tabs are Project, Chips, Tool, Language and Help tabs respectively. Any ICP project file can be “Imported” from the Project tab or the existing ICP project file can be “Exported”.
On the Chips tab, the micro-controller series selected in the first step can be changed.
The software on the micro-controller can be deleted by selecting the “Erase Whole Target Chip” option from the Tool tab. From the Language tab, the interface language can be changed.
Version can be checked on the Help tab. There is a help document about the Programming Tool.
“If the Nuvoton Development Board is used, the integrated programmer (Nu-Link-Me) can be used.”
Connecting to the Processor and Installing Programs
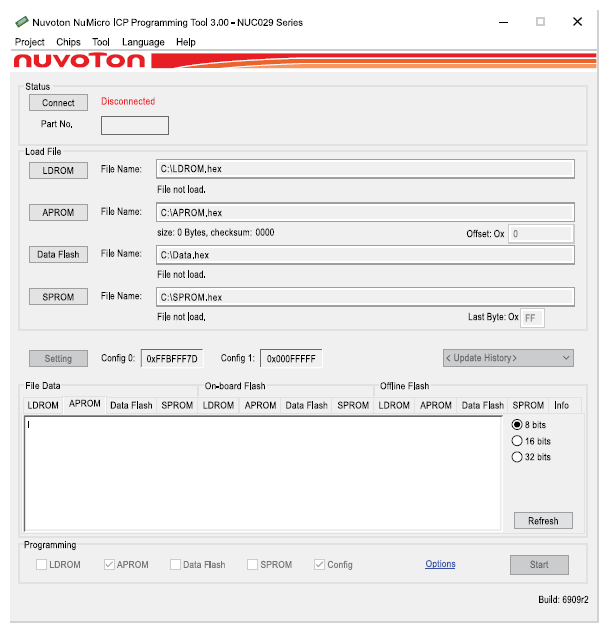
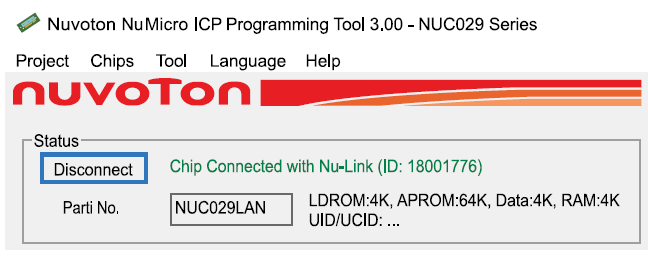
If the Nuvoton Development Board is used, the integrated programmer (Nu-Link-Me) can be used. For this, it is sufficient to only make a microUSB connection. However, if Nu-Link is to be used, pin connections must be made correctly. After these steps are completed, connection to the micro-controller is made by clicking on the Connect button at the top left. If the connection was successful, the “Chip Connected” message in green is shown and the micro-controller used is displayed in “Part No.” section. If the connection has failed, the system does not recognize the micro-controller and the same process is tried again by checking the connections again.
By clicking on the APROM button in the “Load File” section, the .hex file of the software to be installed into the processor is selected. When the .hex file is selected, the data can be displayed on the APROM tab in the “File Data” section at the bottom.
Chip Settings
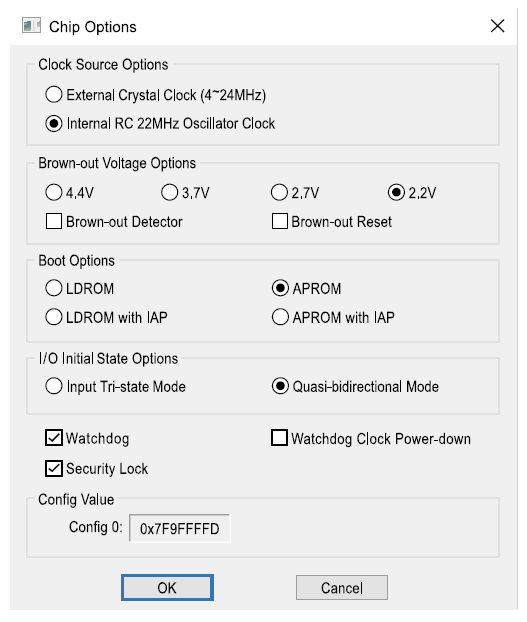
In the ”Config Bits“ section, click on the ”Settings” button to open Chip Options. In this window, crystal selection is made from the “Clock Source Options” section. If an external crystal is used “External Crystal Clock” is selected, if an internal crystal is used “Internal Oscillator Clock” is selected. From the ”Brown-out Voltage Options“ section, on the other hand, the ”Brown-out Detector“ and ”Brown-out Reset” functions can be activated after selecting the Brown-out voltage. If you want to install the bootloader from the ”Boot Options“ section, ”LDPROM” is selected. If standard software installation is to be performed, “APROM” is selected. Input/output mode selection is made from the ”I/O Initial State Options” section. If Watchdog is used in the software, the “Watchdog” option should be activated before installing the software on the micro-controller. The “Security Lock” selection is made to protect the software installed on the micro-controller.
Programmer Settings
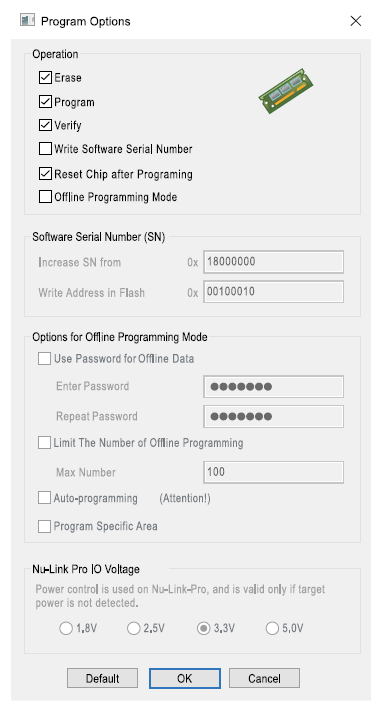
Programmer settings can be made from the “Options” option on the far right in the “Programming” section at the bottom. After clicking on Options, there are some selections related to the programmer in the “Operation” section in the window that opens. The “Erase” option deletes the existing software in the micro-controller, the “Program” option loads the software we selected with “Load File” into the micro-controller, and the verification process is performed by clicking on “Verify”. You can assign a serial number with the ”Write Software Serial Number” option. If the ”Reset Chip after Programming” option is active, the micro-controller performs a reset operation after the program is loaded. If the ”Offline Programming Mode” option is active, the software file is loaded into the programmer’s memory. There are different features in offline mode as well. A password can be set for offline data from the ”Options for Offline Programming Mode” section. At the same time, a programming limit can be set to the programmer. In other words, it can be specified how many boards can be programmed at most after the program is loaded into the memory of that programmer. These features provide great convenience to manufacturers, especially in mass production.
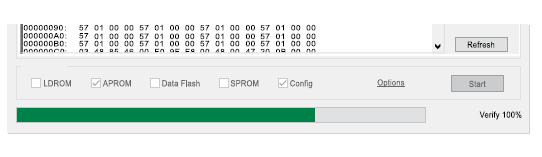
After all these settings are made, the micro-controller is programmed with the “Start” button at the bottom right on the main screen.