


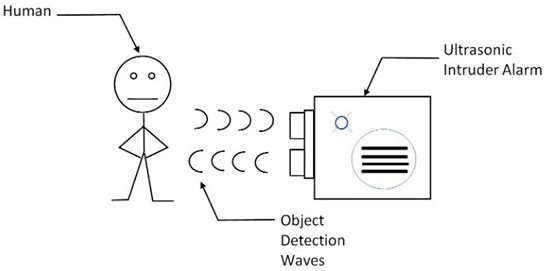
You may have seen projects that use a pair of eye-like sensors, and wondered what benefits they provide. We will create our own Ultrasonic Theft Alarm using Arduino and Ultrasonic Sensor along with a few components, in order to both answer this question and develop a new project.
We will discuss, in order, all the steps that are necessary for us:
- Required materials
- Structure and connection diagram of our circuit
- Coding
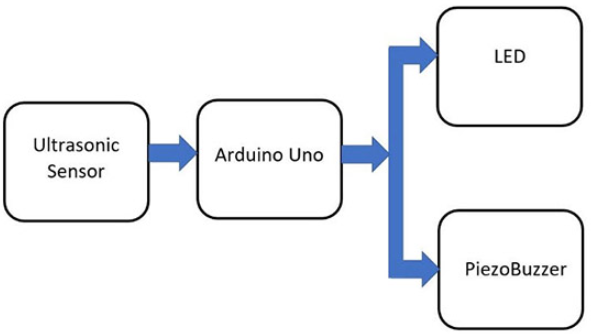
The ultrasonic theft alarm device consists of four main components;
- Ultrasonic Sensor (HC-SR04)
- Arduino Uno
- Led
- Buzzer
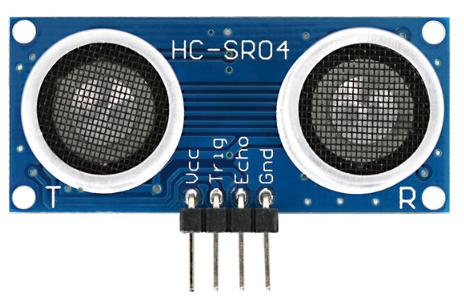
How Does the Ultrasonic Sensor (HC-SR04) Work?
The HC-SR04 is a device used as an ultrasonic distance sensor. It consists of two basic components; a transmitter and a receiver. The sensor uses loud sound waves to measure the distance.
The transmitter, which is a part of the sensor, generates a high-frequency sound wave and sends it through the target. The receiver, on the other hand, detects these high-frequency sound waves reflected from the target and makes a time-distance calculation. So the distance to the target is determined.
The ultrasonic distance sensor is widely used in microcontroller-based projects such as Arduino and similar development boards. It can be easily integrated for distance measurement and is affordable.
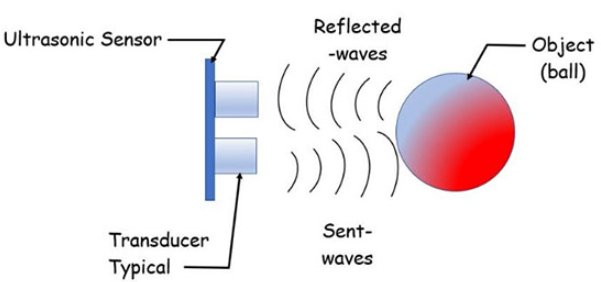
The image below shows how the HC-SR04 sensor measures the distance of an object, with high-frequency sound waves.
You can use the connection diagram below to create the Ultrasonic Theft Alarm device. You can use jumper cables to complete the wiring for Arduino and breadboard.

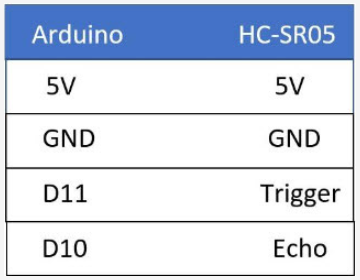
The pins for the 4-pin connection of the HC-SR04 sensor connected to the Arduino are indicated below based on our coding system. You can customize the connection and the pin definitions in the code.
Since we have created the circuit diagram, now we can proceed with the last step of our project by writing the code we have prepared below to Arduino. You can customize the distance that we want our alarm to give a warning, within the code.
#define TRIG_PIN 11
#define ECHO_PIN 10
int LEDpin = 13;
SR04 sr04 = SR04(ECHO_PIN,TRIG_PIN);
long a;
void setup() {
pinMode(LEDpin, OUTPUT);
Serial.begin(9600);
delay(1000);
}
void loop() {
a=sr04.Distance();
Serial.print(a);
Serial.println(“cm”);
delay(1000);
if(a < 200) {
digitalWrite(LEDpin, HIGH);
}
else{
digitalWrite(LEDpin, LOW);
}
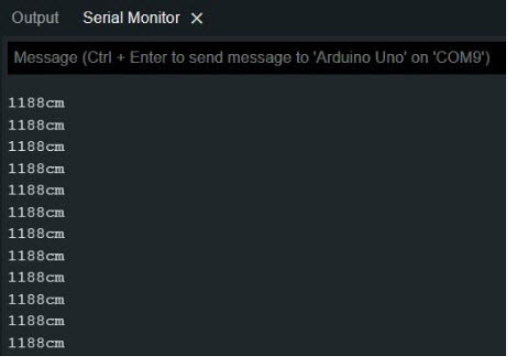
} When you place your hand or an object in front of the ultrasonic sensor, it will give an audible and illuminated warning thanks to our LED and Buzzer circuit. When you turn on the Arduino IDE screen, you can see that the measured distance data is scrolling. To test this function, you can control the measured distance by placing a ruler between your object and the device.
Your “Ultrasonic Theft Alarm with Arduino” project is ready to be applied!
Congratulations…