


You have a camera in your hand and you are asked to take photos in a certain way. What would you do in this situation?
I want to answer this question from the point of view of a photographer, and ask you to answer the “What would you do in this situation?” question when you come to the end of this article. There are basic issues that we need to take into account when getting the camera into our hands. First of all, we need to check whether the battery that will allow us to take photos is full and whether the memory card is inserted. If these are missing, all the rules of photography would become meaningless and this is a
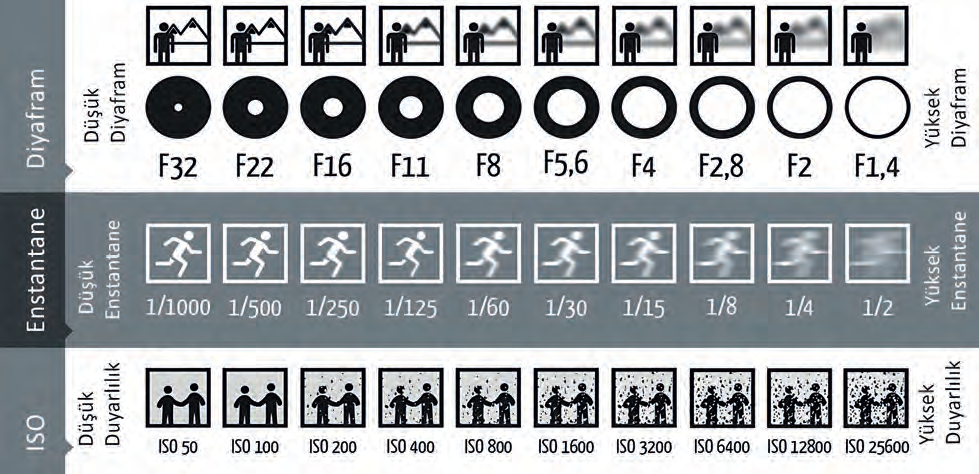
common mistake that many photographers make. Just take your camera with the lens attached, check the battery is full and the memory card is empty, and you are ready to take a photo! There are many settings on the machine but this should not scare you. We will focus only on the basic settings. First of all, we need to understand the shooting modes in the camera as well as their functions. To better understand these shooting modes, we must comprehend the exposure triangle first. In order to take a nice photo we need to set the exposure, which refers to the correct lighting level. At this point, the exposure triangle comes into play. The basic elements that make up the imaginary lines of the exposure triangle are Aperture, ISO and Shutter. To understand these elements in more detail, let’s start with “aperture”.
What is aperture?
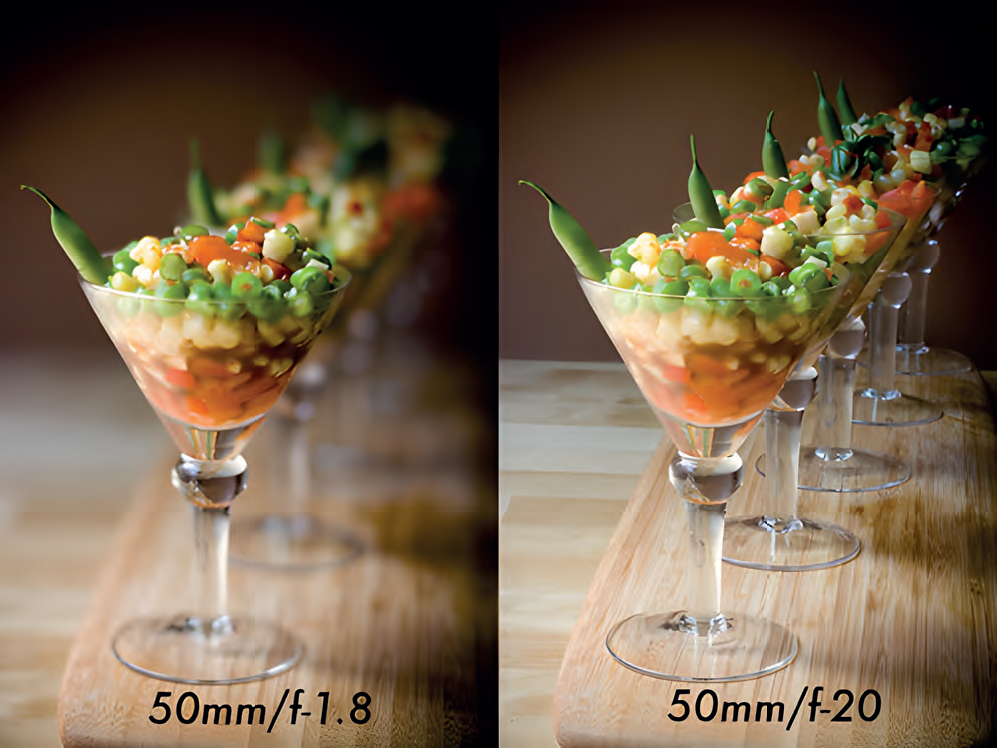
The aperture is symbolized by the letter “f” when displayed. For example, in expressions such as f/1.4 or f/16, we can understand that 1.4 or 16 is the aperture value. The reason for using aperture is to determine the sharpness range and adjust the clear or blurred sections in front of the camera. We
usually use this setting when shooting stationary objects. For example, if there is an object that we want to bring to the foreground we can blur the background by reducing the aperture value and make the object the main subject. On the other hand, we want the whole scene to be clear when shooting a large area, such as a building or a mountain, and in such cases, we can make a large area of the photo clear by increasing the aperture value. The reason why the aperture is located in the exposure triangle is that the adjustment of the aperture directly affects the lens mechanism. As the value decreases the aperture of the lens increases, and therefore more light enters the lens of the camera, while as the value increases the aperture of the lens decreases and less light enters the lens. The sharpness range is also determined by these mechanical adjustments. We can influence the exposure value by controlling the amount of light entering the camera. That’s why one component of the exposure triangle is the aperture.
What is a shutter?
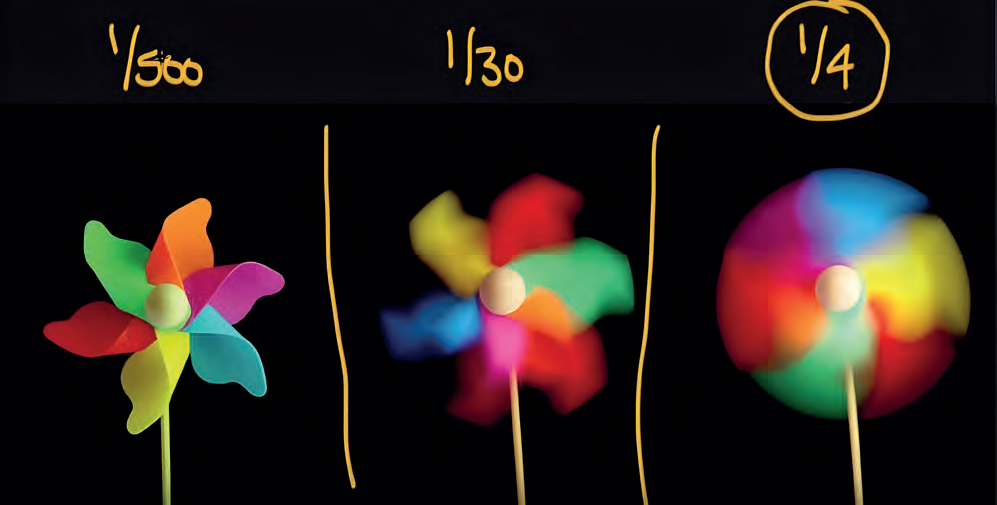
Shutter is also known as shutter speed or shutter value. This is related to the speed of operation of the mechanism inside the camera from which the shooting sound originates. The shutter setting determines the opening and closing time of the shutter unit in front of the sensor and the duration it will remain open. For this reason it is expressed as a “1/x” value. Here, “x” is the opening and closing time of the shutter unit. For example, when we select the value 1/1000, the shutter unit opens and closes just in 1/1000 seconds, which allows us to shoot a moving object as if it were stationary. On the other hand, when we select the value 1/2, the shutter unit remains open for half a second and shoots the moving object as it moves. The main purpose of using a shutter is to determine how much the movement will be felt when shooting moving objects. Let’s assume that there is a flying object in the air, and we want to give the answer of “Is this object moving up or down, or is it stationary in the air?” question on the photo that we are shooting. By reducing the shutter value, we can ensure that the object leaves a trace based on the direction of movement. Or, let’s assume that it’s not important for us to reveal whether the object in the air is moving or not, and we just want to shoot it clearly. In this case, we prefer to shoot clearly by increasing the shutter value and freezing the object as if it were motionless. The reason why the shutter is located in the exposure triangle is that the change in the shutter speed directly affects how much light will be received by the sensor. When we increase the shutter value, the shutter unit closes faster and the sensor receives less light. When we decrease this value, on the other hand, the shutter unit moves slower and causes the sensor to receive more light. In conclusion, shutter is a component of the exposure triangle since it directly affects our exposure value.
What is ISO?
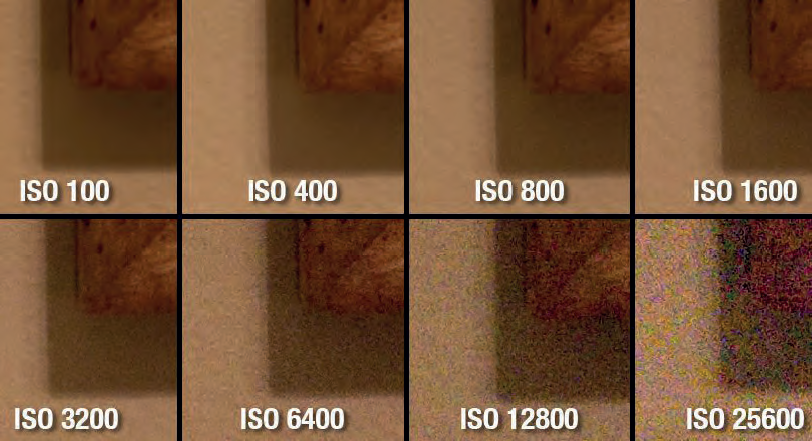
ISO is used to adjust the camera sensor’s sensitivity to light. We want to keep the ISO value as low as possible to get the highest quality photos. Increasing the ISO value leads to a sandblasting effect in the photo and negatively affects its quality. When shooting in a shady environment we adjust the exposure by increasing the ISO value and optimize the level of light. The reason why ISO is located in the exposure triangle is that it is a setting that is directly related to the light. That’s why ISO is an exposure triangle component that “saves the moment”. Now that we have learned all the three components of the exposure triangle we will now look into the relationship, harmony and functioning logic of these three components with each other. The cameras have an exposure meter that shows the exposure value. We make the exposure settings according to our individual preferences by using the reference values indicated by the exposure meter, and we use the exposure triangle to get the correct exposure.
We want to keep the ISO value as low as possible to get the highest quality photos.
If we proceed step by step
As a first step we set the ISO value to the lowest value that the camera accepts, and ISO should be the last setting we use. If we are shooting a moving scene, we can choose the shutter priority “S” or “Tv” mode. We adjust our shutter value to make the camera adjust the aperture automatically based on the exposure.
Photography is an aesthetic art as well as a craft due to its functional applications
If you are shooting a still scene, you can use aperture-priority “A” or “Av” mode. You just adjust the aperture and leave the shutter adjustment to the device based on the exposure The ”P” mode automatically determines the exposure value, taking into account the inverse of the settings made by the user. If you change the aperture the camera automatically adjusts the shutter value, and if you change the shutter, it automatically adjusts the aperture value. If the aperture and shutter settings are adjusted in both frames but the light becomes insufficient and the desired exposure cannot be obtained, you can shoot by increasing the ISO value to get the correct exposure. If the ISO
value exceeds 3,200 and you still cannot achieve the desired exposure value, you can prevent
sandblasting by compromising on the aperture or shutter settings.
A person who has just started photography or is unaware of the basic camera settings can switch the device to automatic mode, select the “Auto” mode indicated by the green icon and ensure all the settings are made automatically without a personal touch. Now we learned the shooting modes and camera settings. Once the exposure triangle, which initially may seem complicated, is comprehended, it becomes possible to make the right adjustments in just a few seconds, which opens the door to take awesome photos. Now, let’s get back to our question at the beginning of the article: “You have a camera in your hand and you are asked to take photos in a certain way. What would you do in this situation?”.
A person who has just started photography or is unaware of the basic camera settings can switch the device to automatic (green) mode, select the “Auto” mode indicated by the icon, and ensure that all settings are made automatically without a personal touch.

Now let’s look into these subjects in a practical way from the photographer’s point of view, using the modes and camera settings.
Auto Mode: If you want to take a beautiful photo in the most practical way regardless of the subject, you can take shoot by switching your camera to green, i.e. the “Auto” mode. However, this will make it easier to adjust the exposure, while it makes quite difficult to capture the photo the way you want. For this reason, it is known as a setting that is not preferred by people who master the exposure triangle.
A (Av) Mode: Assume that you are sitting at a long dining table and want to take photos of people posing for you. Everyone is posing, but there are great distances between them since the table is too long. In such a case, by switching your camera to “A” or “Av” mode and increasing the aperture
value you can make everyone clearly visible and take your photo. If there is only one person posing in front of the table and you want to focus on that person, you can blur the background by reducing the aperture value and take a photo by bringing the person to the foreground.
S (Tv) Mode: If you want to shoot a fast-moving car, you can set your shutter speed by switching your camera to “S” or “Tv” mode. You can lower the shutter value and freeze the moving car, or increase the shutter value and shoot by highlighting the movement, i.e. the speed of the car. Depending on the environmental conditions and your own touch, you can choose the desired mode and shoot comfortably, taking also into account the exposure triangle. Lastly, an important point that should not be forgotten is that photography is an aesthetic art as well as a “craft” due to its functional applications. Instead of strictly adhering to the rules, sometimes you can achieve impressive results by deviating from them, which would be the biggest factor that distinguishes you from others and makes you stand out.